
You are practically invisible or hidden if Google does not index your website.
You won’t appear for any searches and won’t receive any organic traffic at all. Hence, No traffic means no revenue.
If Google is not indexing your website then you are on the right page, let’s see how to crawl and index your website on Google.
How to Check if your site is indexed in Google?
To find out whether your web page is indexed or not here is the process
- Open any browser (chrome, Opera, Firefox, etc).
- Copy the link to your web page which you want to know about indexing.
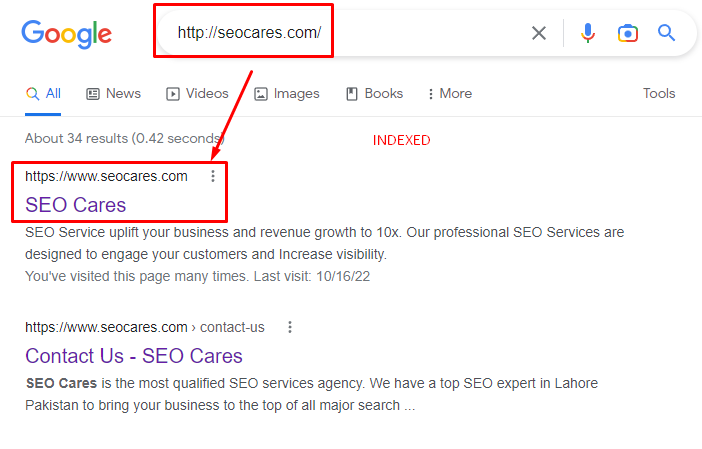
- Paste your website URL in the Google search bar after Site: For example site:https://seocares.com/
- If it will show up in the results then your site is indexed and if it will not show up in the results then your site is not indexed yet.
- If showing This means your website indexed in google

If not showing any page in the results then This means your website is currently not indexed in Google.

How can I get Google to crawl my website?
To make Google to crawl your web page or website, you have to follow these instructions:
- Submit the Sitemap first.
- Share the link of your web page which is not indexing on social media. It will aid Google to crawl your website.
- Create some quality backlinks like guest posting. Google will track your site’s link from there and will acknowledge it.
Primary Ways to index your website on google:
Here are some ways to index your website on Google:
- Submit a sitemap in the Google search console.
- Share your web page on social media that you want to index.
- Create some contextual backlinks.
- Improve your website’s internal linking (your every post or page should be linked to a relevant page).
How to index a WordPress site in Google through RankMath instant indexing?
- Go to your website’s WordPress dashboard
- Click on RankMath
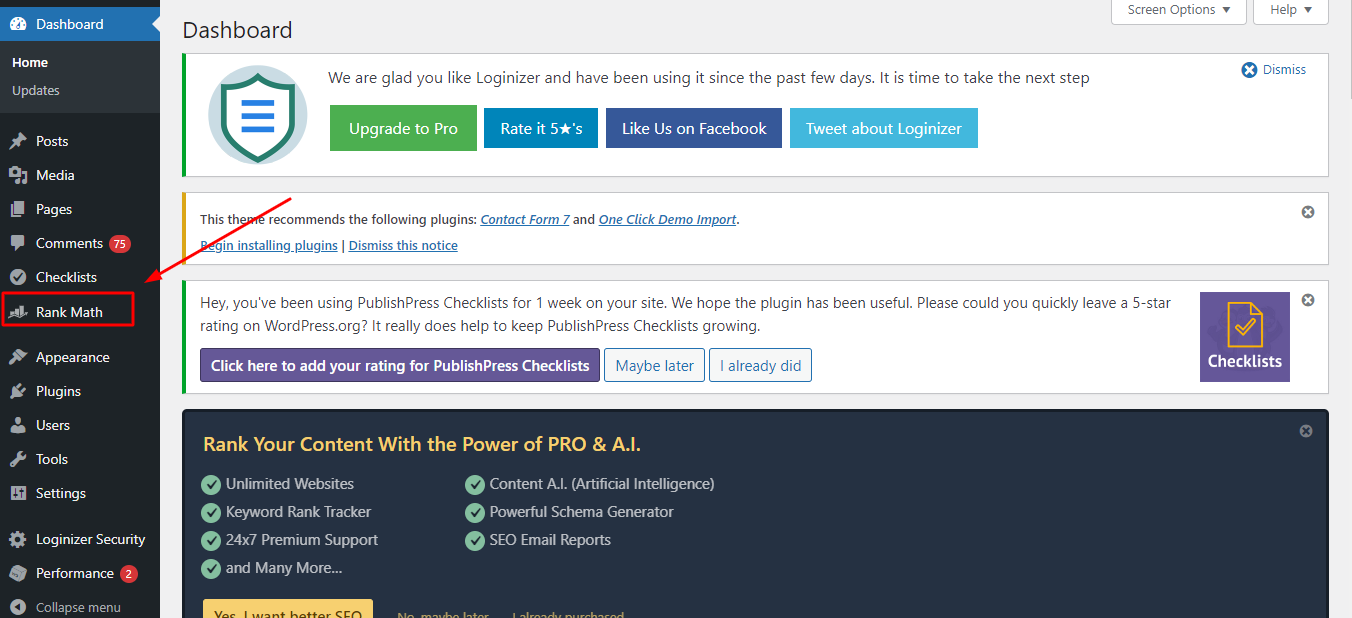
- You will land on RankMath DASHBOARD page here you can see the instant indexing section.
- After that enable instant indexing

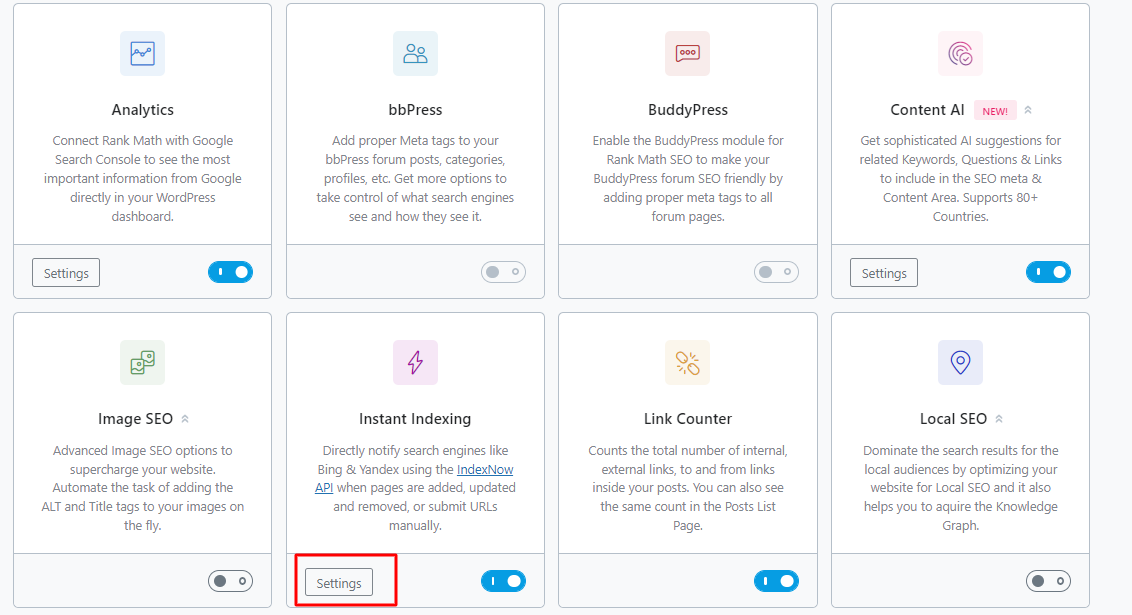
Here you can send manually your pages links to instant indexing API:
- If you want to manually click on Settings.
- Then you will find a section, paste your URL here that you want to instant index.
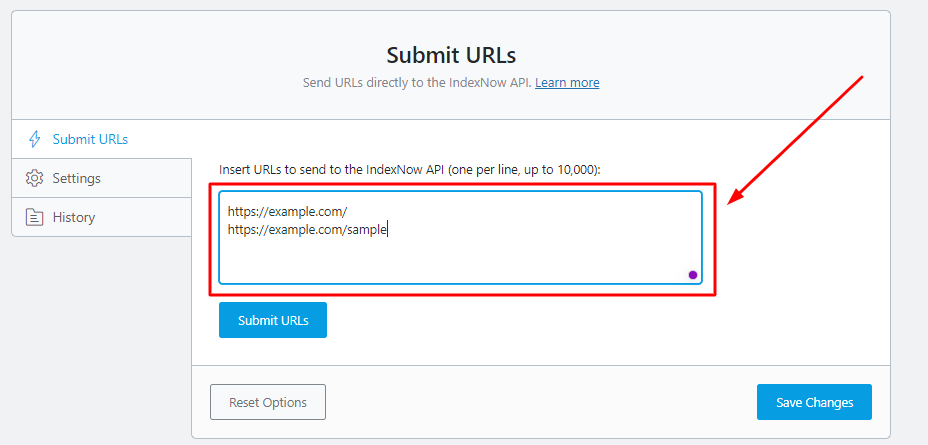
- Click on submit URL.

- Now, click on save changes.

Index your website through instant indexing Google API
To use the Indexing API, follow these steps:
Note: You can ask Google to remove or add pages from its index using the Indexing API.
The requests must include the URL of the desired web page. Additionally, you can view the status of Google notifications that you have sent.
Currently, only sites containing JobPosting or BroadcastEvent embedded in a VideoObject may be crawled using the Indexing API.
Before starting the process must Download Indexing API Plugin of Google.
Points to Create an Indexing API Project:
- Open the “Google Cloud Platform“.
- By selecting the “Create Project” option, make sure you’re creating a brand-new Indexing API project.
- you can also tap on the “Select a project” option and can select “New Project” from the options that will be shown on the screen.
- On the following screen, Write a project’s name that you will identify later on.
- Tap “Create“.
Enable Access to API:
- After the project is created, you must provide it access to the API.
- You would get the options on the next screen. Verify that the chosen project is the one we made for the Instant Indexing API.
- To switch projects, use the shown menu at the top. Click on the “project” and then choose “Next“.
- The next point is to click on the ” Enable” option. It will enable the project to have access to the indexing API.
- Close this tab after enabling it.
Guide to creating Service Account:
- The next step is to open the service accounts page and generate a service account.
Choose a project:
- You will be asked to choose the API project for which you want to create this service account first (the one created in the last step).
Create Service Account:
- You will be there on the next page after tapping on the “project” for which you have to make a service account, where all you have to do is to choose the “Create Service Account” option mark.
- Give a name to the recently made service account and add a description on the “Create service account” screen.
- You will need the entire Service Account ID, which looks like an email address, so make sure to select and copy it. Next, press the bottom-right button marked “Done”.
Manage Keys for Service Account:
- The file containing your API key will thereafter be available for download. Simply pick the Manage keys by clicking the three vertical lines in the Actions column.
New JSON Key Creation for Service Account:
- After being brought to the next screen, click “Add Key” and choose the “Create new key option”.
- When asked in the popup, select the “default JSON format” and click “Create”
- The.json file will instantly download in your browser when you click “Create”, it indicates that you have finally created the API key and can move on to the following step.
Add the Service Account as a holder of Your Google Search Console account:
If you haven’t already, you’ll need to register and validate your site with the Google Search Console to accomplish this. It’s really simple to do this; just follow the instructions to confirm your property’s ownership.
- Go to “Users and Permissions” under Settings for Google Search Console.
- Open the Google Search Console after you’ve verified your property, choose “your property” on the left (if prompted), and then click “Settings” down at the bottom.
- Then select “Users and Permissions”.
- Add a User to the Property in Your Search Console
- Select “Add User” by clicking the three dots next to your account.
Ownership of Service Account ID:
- There will now be a pop-up. In the Email address area, type the Service account ID that you already copied out. Make sure you’ve given Owner level Permission before clicking “Add”.
- You will see the Service account displayed as a new Owner immediately.
Configure the Plugin:
All that you have to do is set up the Instant Indexing plugin on your WordPress website after creating the “API key” and adding the service account to your search console setting.
Install Instant Indexing Plugin:
- Using the WordPress dashboard, upload the Instant Indexing plugin that you downloaded in the previous step to complete the installation process.
- Otherwise, you can do so by going to Plugins > Add New in the WordPress Admin panel. Look for and install the Instant Indexing plugin.
Write Your API Key in the “Plugin Settings”
- Simply go to RankMath > Instant Indexing Settings in your WordPress admin area after installing and activating the plugin, and under the Google API Settings page, paste the contents of your JSON file or just upload the file.
- Click “Save Changes” after choosing the Post Types where you wish the Indexing API to notify Google to scan your website whenever a post is published, edited, or deleted.
- It’s time to employ Google’s indexing API to almost instantly index any post or page on your website.
- From the page’s top, select the “Console tab”.
- In the Instant Indexing box, enter one or more URLs and select “Google”: Publish/update URL. tap the Send to API button after that.
Send URLs to API for Indexing|:
- You will then get a reply from the API.
- To remove a URL from the index or to find out its current state, use the Remove URL or Get URL Status actions.
- You can alternatively index the URLs from the WordPress Posts section rather than typing them. There will be a button to check the status of a post or update.
- The “bulk action” options can also be used to quickly update or index several posts.
- That’s all, then! We sincerely hope that you are now able to make use of this guide in order to get started using Google’s Indexing API.
How to index websites in the google search console?
- Go to google search console.
- Copy your webpage that you want to index.
- Paste the URL in the top search bar on the Google search console.

- Then click on “Request Indexing“.

- Click on “Live Test” here you can see your URL and if you have any indexing issues.

Get google to index your post, page or site using internal linking
- Look for your blog post which is already indexed by Google.
- Now put that post link (which is not yet indexed), in the indexed post (Link should be placed in natural and relevant anchor text)
- Google crawlers will come to that indexed post, crewel your link from the post and 85% chances are that Google will index non-indexed link as well (that you have placed in post).
How can I get my site indexed by Google?
Below are the primary methods for aiding Google in finding your pages:
- Submit a sitemap.
- Make sure people are familiar with your website.
- Ensure your website has thorough link navigation.
- Mail a request for indexing of your website’s homepage.
- It can be more difficult to crawl websites that employ URL parameters instead of URL routes or page names.
Does Google crawl indexes?
Yes! Sometimes. The majority of our search index was created by crawler software.
These operate similarly to web browsers in that they view publicly accessible web pages and click links on those pages automatically.
Is Google indexing free?
Yes! “Google site index checkers” quickly check your website for free.
Google index checking can be done in one of two ways: manually for each page, or by using a Google index checker PHP script.
How long will it take Google to crawl my new site?
Your new website will take around 4 days to 4 weeks to be crawled and indexed by Google.
However, this range is somewhat broad, and it has been contested by those who say they have scanned websites in fewer than 4 days.
What is the difference between crawling and indexing?
Finding sites and links that link to other pages is known as crawling.
Storage, analysis, and organization of content and links between pages are all part of indexing.
Some indexing components influence how a search engine crawls.

How frequently will Google crawl my website?
Google should crawl your website every four to thirty days, depending on how frequently it is used.
Usually, Googlebot often searches for new content first, sites that are updated more frequently tend to get scanned more often.
How do I improve my SEO crawling?
You can improve SEO crawling by doing these important things:
- You should update and add new content on your site more often. Enhance your site load time.
- To increase Google crawl rate you should include Sitemaps.
- Enhance server response time.
- Avoid posting duplicate or copied content.
- You should block unnecessary pages through robots.
- Always optimize videos and Images.
Why is SEO Cares a better option to deal with such SEO problems?
We have our SEO expert team ready to help your website indexing and ranking issues solved.
Our SEO services in Islamabad offer a wide range of services not only in Pakistan but all over the world.
Last Words:
If Google crawls your website, it doesn’t mean that it will index it.
It depends on the quality and length of your posted content.
The most efficient ways to index your website on Google are mentioned above, but there can be some technical issues if your website is not ranking.
The above-given methods will help you to index your site.